Sunday, March 22, 2015

The beginning of the end?

If you have been following along, the Large Craft class is working on building a Hacker 21. The new boat will have a bottom laminated of mahogany over marine plywood and mahogany sides and decks. I hope there is still a market for wooden boats of this type and that this is not a sign of things to come.

THE FIRST FIBERGLASS HACKER-CRAFT

The 27-foot boat will be at the Palm Beach International Boat Show this month.

Hacker Boat Company will display its first-ever fiberglass boat, a 27-foot model, at the Palm Beach International Boat Show from March 26-29.

“Over the years, prospective customers have asked if we make a fiberglass hull,” President and CEO George Badcock stated in a press release. “We decided to introduce this model to meet that demand.”

Hacker Boat Company is America’s largest builder of mahogany motorboats, with its designs dating back to the 1930s. Hacker-Craft models will continue to be built in mahogany in addition to the fiberglass option on the 27-footer.

The fiberglass boat weighs 5,250 pounds and is powered by a 430-horsepower Ilmor engine. Options include a swim platform and boarding package, underwater LED lights and a bow thruster. Base price is $325,240.

Q & A: Why Predrill Screw Holes?

I've learned the hard way that not predrilling hard woods can be disastrous and also have been accused of predrilling when not necessary...better safe than sorry.

By:  | 


PWE150322_QAfullQ. I think predrilling screw holes is a real drag, so I rarely do it. Most screws seem to work fine without all that bother. Why are you always advocating predrilling?
A. Call us old fashioned, but when you’re working in solid wood, we believe you’ll get the most effective and longest-lasting fastening power from screws when you drill correctly sized clearance and pilot holes.
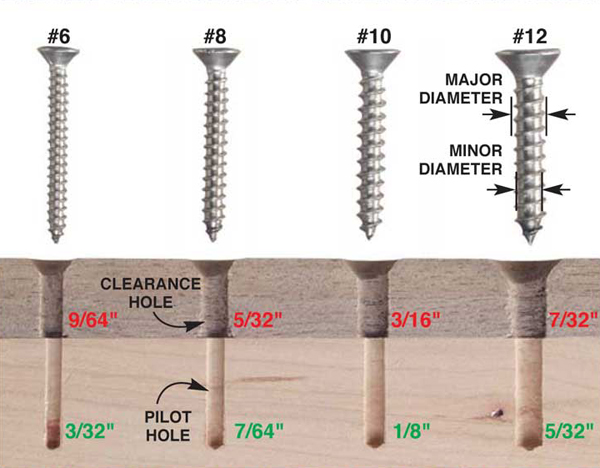
First, drill a pilot hole through both boards. Pilot holes guarantee that your screw won’t break off and your wood won’t crack. For most hardwoods, the pilot hole should be at least as large as the screw’s minor diameter. If the screw has deep threads, or the wood is very hard, the pilot hole should be another 1/64-in. larger than the minor diameter. For softer woods, the pilot hole can be 1/64-in. smaller.
Skipping the pilot hole, or drilling one too small, can create hairline cracks in solid wood and MDF. Visible cracks are obviously bad,but other cracks that are too small to see can eventually widen and cause the joint to fail.
Second, enlarge the pilot hole in the top board to make a clearance hole. This larger hole allows the screw to pull the two boards together. The clearance hole should be at least as large as the major diameter of the screw. Skipping the clearance-hole step often results in a small gap between the two boards you’re joining together. Glue won’t effectively bridge a gap larger than the thickness of a piece of paper.

Friday, March 13, 2015

VIDEO: Famous John Steinbeck boat undergoes $2 million makeover


Posted on 

A boat made famous by John Steinbeck’s “The Log of the Sea of Cortez” is getting a $2 million overhaul after having spent about a year underwater.

The Western Flyer was salvaged from La Connor Channel in Washington and hauled to Port Townsend, Wash., where restoration work is getting started.

“There she is. You can see she’s a little caved in there,” Peter Quinn, a Steinbeck fan and the owner of Port Townsend’s Imprint Bookstore, told KOMO News.

“The Log of the Sea of Cortez” was a 1951 Steinbeck non-fiction book that chronicled the sea and nature during a 6,000-mile voyage with scientist friend Doc Ricketts. Steinbeck rented the sardine fishing boat and had it sailed to Mexico. The boat was built in Tacoma, Wash., in 1937.

Quinn said “the universe lined things up and brought the boat to Port Townsend,” the perfect place because it is a well-known literary town and renowned for its wooden-boat craftsmen. Quinn said the town is thrilled that California businessman John Gregg, the new owner, ended the scuffle for ownership.

“The good news is that Mr. Gregg appears to want to keep her whole,” he said, “and put her back together again here in Port Townsend, where we have some of the best shipwrights in the world.”

Work on the Western Flyer is just getting started, including repair to the ladder Steinbeck climbed and the door he used, even the stem where he may have manned the wheel. Interior photos show why the restoration could cost $2 million: The boat is a mess but structurally intact.

“Interestingly, people [who] have come from other countries say, ‘We’re here to see Steinbeck’s boat,’ ” Quinn said.

The restoration is expected to take about two years.

Design, Lofting and Development

In our Design Workshop on Tuesday we were visited by James Franken, a well known and respected Yacht Designer and Lofting Specialist in Port Townsend. Jim presented us with a demonstration of the design, lofting and construction process using only CAD and Rhino (software not the animal). What was so incredible was that everything we have traditionally learned to do by hand with paper and pencil or on the lofting floor was done on the computer. Yes, you do need to know how to draw and fair lines and you need to understand the lofting process to be able to use the software. The software does not replace the traditional skills needed in design and boat building but allows the designer to be able to communicate his intentions in a clearer picture (as shown below). And if that is not enough, the information contained in the design in CAD or Rhino can then be transmitted to someone with a CNC machine to make parts, molds and even a complete boat. For example, Jim was instrumental in the lofting and creating the CAD files for a local company to cut and make all of the pieces for Sliver (the 62 foot Robert Perry design built by the school). The possibilities are endless. Needless to say many of us are using the student discount given to acquire this software. 

Here are some examples of Jim's work:


Tuesday, March 10, 2015

Exercise from "By Hand & Eye"

Jim Tolpin, one of the authors of "By Hand & Eye" is a local legend here in Port Townsend. I have not exactly taken the plunge into the depths of fine woodworking quite yet but thought this was an interesting exercise to get your mind going in that direction.

Your Assignment Today…

dividers_pencil_IMG_0515
The lessons inside “By Hand & Eye” cannot be learned by reading alone, any more than you can learn to cut dovetails from a book.
You must put pencil to paper so the book’s ideas about proportion will become physical things on the page before you. Then the ideas will be in your fingers – not just your mind. When I was editing “By Hand & Eye,” I had to perform these exercises to gain entrance into the heads of Jim Tolpin, George Walker and the pre-Industrial artisans. (Many of the exercises were done at a bar in the Dallas/Fort Worth airport, which generated a lot of odd looks from fellow passengers.)
It was well-worth doing and has absolutely made me a better designer.
This week we had a reader who was struggling with the first drawing exercise in the book called “Making a Visual Scale.” In that exercise, you are asked to make seven rectangles using a compass, straightedge and pencil. Tolpin and Walker are purposely a little obtuse about the process to make the rectangles because it’s important that you make a small mental leap yourself.
To help the reader, George offered a small nudge on his blog yesterday in this entry. If you have been struggling with this exercise (or skipped it – naughty, naughty), here’s the chance to wake up your inner eye this Saturday. Give it a cup of coffee.
For those of you who don’t own the book, here are the four pages from the book in pdf format so you can try it yourself.
If you like this sort of thing, you are going to be thrilled by an upcoming and inexpensive workbook from Tolpin and Walker. The workbook answers this question: Can you learn design from a cartoon dog? More details to come.
— Christopher Schwarz
P.S. “By Hand & Eye” is back in stock in the Lost Art Press store after we sold out of the last printing.

A word from our sponsor..

Just kidding. Though full disclosure I did purchase the "Skraper" from Benchcrafted and it is an amazing tool. This an endorsement from Chris Schwartz for a draw knife sharpening jig from Benchcrafted.  Something you probably don't need but something that is definitely on my shopping list.


Galbert Drawsharp in Use


drawsharp_open_IMG_0532
Before you read beyond the first few sentences of this blog entry, there a couple things you should know:
  1. I have no problems sharpening a drawknife. Never have (except that time in the 1990s where I ended in the ER for seven stitches). One of the first tools I inherited from my grandfather was his old drawknife, which I still use.
  2. I have just finished editing a chairmaking book by Peter Galbert that my company is publishing. I’m a huge fan of Peter’s work, his writing and the tools he makes.
When Galbert’s Drawsharp was released in October 2013, I didn’t jump to buy one. I didn’t really need any help sharpening my drawknife, so it seemed like a jig that would sit around collecting dust (like those bench cookies).
But something – I don’t know exactly what – made me decide to plunk down the $85 and purchase the Drawsharp, which is made by Benchcrafted. I’ve been using it during the construction of a couple chairs and am quite impressed.
The beauty of the jig is that it creates a consistent and sharp edge across the entire length of the drawknife. That is a challenge for beginning sharpeners to do. They end up making some parts sharper than others. And they change the geometry of the edge in places because there is about four times as much edge to sharpen as there is on a No. 5 bench plane.
So the drawknife cuts inconsistently in different areas of the edge.
drawsharp_back_IMG_0539
After years of tending to my grandfather’s knife I can get a very nice edge. But it’s still not as consistent as the one I get on the Drawsharp. What’s equally remarkable is how fast the jig works. If we’re being honest, I’d tell you it takes me about 15 to 20 minutes hone my drawknife freehand. With the jig, it takes about 3 minutes. Wow.
The jig itself is clever and well-made (in the USA, too). The instructions are brief (one sheet of paper) and if you learn better by watching video you can check out the Benchcrafted site. Basically, the jig slides like a monorail along the back of the knife and sharpens the bevel and the back of the knife with diamond abrasive and then #600-grit sandpaper.
drawsharp_bevel_IMG_0535
The only downside to the jig, as far as I can tell, is that it might be troublesome to use with drawknives that have been abused. For example, someone used my grandfather’s knife like a splitting froe and hit the spine of the knife with a hammer. So its spine is dinged and misshapened. I spent about 30 minutes filing the spine, but it still wasn’t satisfactorily smooth to run in the Drawsharp. I might have to borrow a friend’s belt sander to make it right.
That’s why these photos show me sharpening a Lie-Nielsen drawknife (which is crazy nice).
Good jigs add consistency and (in many cases) speed to a process. It’s up to us to decide if a particular jig is worth owning for our own work and the tools we use. I love chairmaking a lot more than I love sharpening, so the Drawsharp has earned its place in my tool chest.
— Christopher Schwarz
drawknife_seat_IMG_0541

Tool Chest Hinges

Details, details, details...leave it up to Chris Schwartz to find a reason to write about chest hinges.

Improve Your Tool Chest Hinges

DIY tool chest hinges
Old tool chests typically have two weak spots: the bottom and the hinges.
The bottom gets rotted out because tool chests end up in unfriendly, poorly drained areas. That’s why many tool chest bottoms are merely nailed on – so they can easily be replaced.
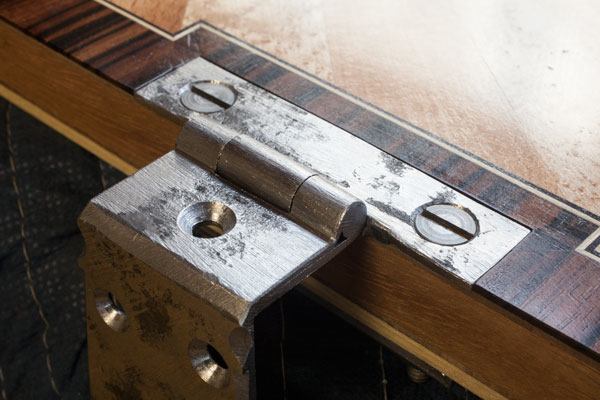
The hinges usually fail because the screws come loose. Many tool chests are made from pine and the lids get a lot of abuse. When examining old tool chests I see a lot of repairs to the screws: Small screws have been replaced with too-big screws. Screw holes have been plugged with dowels and then redrilled. Both of these solutions are not ideal.
A few chests I’ve examined have a novel and stout way of making sure the lid does not come loose. I’ve used this technique on a few chests and am a fan. It takes a little longer, but the lid will last.
This week I’m finishing up a tool chest that is a joint project with Jameel Abraham at Benchcrafted for an upcoming issue of Popular Woodworking Magazine. I built the chest and interior; Jameel did the very sweet lid. You can get a peek of some of the details in Jameel’s recent posts on his blog.
Tool chest hinge hardware
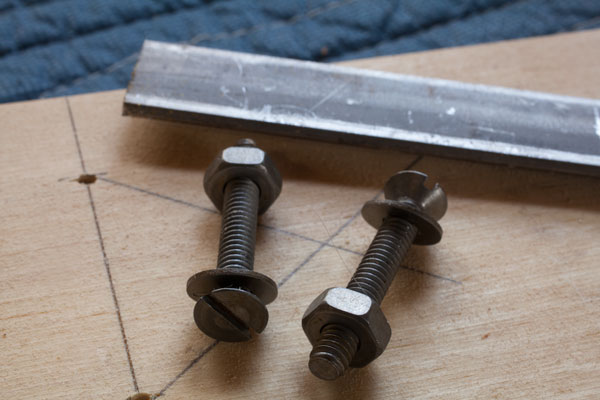
I sure as heck do not want this lid to come loose – ever. So here’s how I attached the hinges to the lid. All this is done with blacksmith-made hinges and home-center hardware (No. 12 machine screws, washers, nuts and 1/8” x 3/4” steel plate). Plus, I don’t really have a lot of metalworking tools. In other words, anyone can do it.
First I drilled the holes and countersinks in the hinge plate. If I were using wood screws, I would drive three screws into the lid. But because this assembly is so robust, I use two machine screws. I placed the hinges in place on the lid and used the holes in the hinge to drill clearance holes into the lid that are a few thousandths of an inch bigger than the machine screws. Drill all the way through the lid.
I hacksawed out two pressure plates from the 1/8” steel that matched the size of the hinge leaf, in this case 3/4” x 3”. I filed off the burrs and cleaned the ends with a file.
Again using the hinge as a template, I marked the steel plate for through-holes. I punched the center of each hole and then drilled holes in the plate with a twist bit.
DIY hinges for wooden tool chest plans
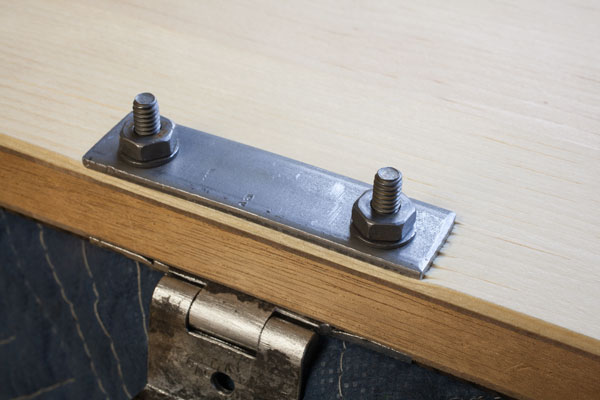
Then I assembled the sandwich of steel and wood. It’s easy to over-tighten these nuts, especially on a softwood lid. So take it easy.
Tomorrow I’ll saw the machine screws to final length and file things smooth.
When final assembly times comes, I’m going to add some Locktite to the nut to keep things tight for my lifetime.
Note that this isn’t ideal for a chest where you are worried about someone loosening the hinges and stealing your tools. In this case, the thief would probably just grab the whole chest and not bother with jimmying your hinges.
— Christopher Schwarz