Improve Your Tool Chest Hinges
Old tool chests typically have two weak spots: the bottom and the hinges.
The bottom gets rotted out because tool chests end up in unfriendly, poorly drained areas. That’s why many tool chest bottoms are merely nailed on – so they can easily be replaced.
The hinges usually fail because the screws come loose. Many tool chests are made from pine and the lids get a lot of abuse. When examining old tool chests I see a lot of repairs to the screws: Small screws have been replaced with too-big screws. Screw holes have been plugged with dowels and then redrilled. Both of these solutions are not ideal.
A few chests I’ve examined have a novel and stout way of making sure the lid does not come loose. I’ve used this technique on a few chests and am a fan. It takes a little longer, but the lid will last.
This week I’m finishing up a tool chest that is a joint project with Jameel Abraham at Benchcrafted for an upcoming issue of Popular Woodworking Magazine. I built the chest and interior; Jameel did the very sweet lid. You can get a peek of some of the details in Jameel’s recent posts on his blog.

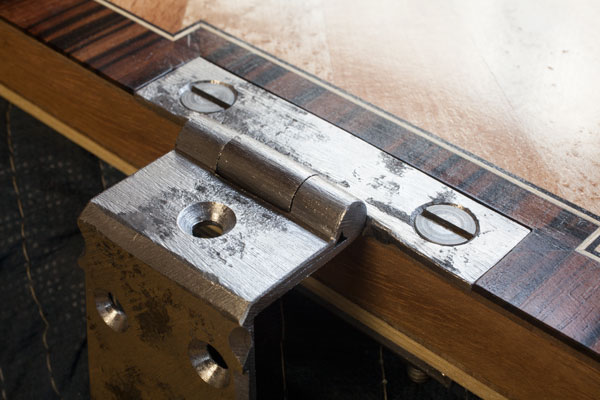
I sure as heck do not want this lid to come loose – ever. So here’s how I attached the hinges to the lid. All this is done with blacksmith-made hinges and home-center hardware (No. 12 machine screws, washers, nuts and 1/8” x 3/4” steel plate). Plus, I don’t really have a lot of metalworking tools. In other words, anyone can do it.
First I drilled the holes and countersinks in the hinge plate. If I were using wood screws, I would drive three screws into the lid. But because this assembly is so robust, I use two machine screws. I placed the hinges in place on the lid and used the holes in the hinge to drill clearance holes into the lid that are a few thousandths of an inch bigger than the machine screws. Drill all the way through the lid.
I hacksawed out two pressure plates from the 1/8” steel that matched the size of the hinge leaf, in this case 3/4” x 3”. I filed off the burrs and cleaned the ends with a file.
Again using the hinge as a template, I marked the steel plate for through-holes. I punched the center of each hole and then drilled holes in the plate with a twist bit.
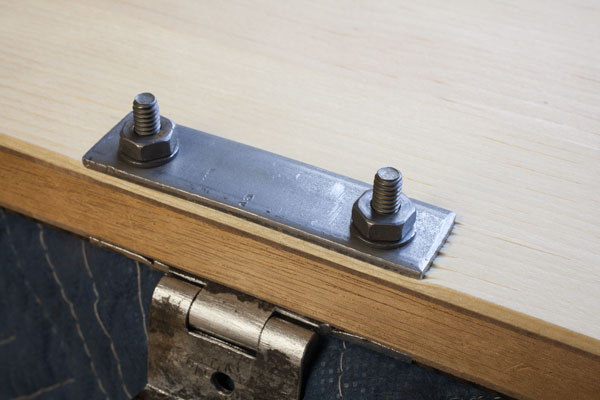
Then I assembled the sandwich of steel and wood. It’s easy to over-tighten these nuts, especially on a softwood lid. So take it easy.
Tomorrow I’ll saw the machine screws to final length and file things smooth.
When final assembly times comes, I’m going to add some Locktite to the nut to keep things tight for my lifetime.
Note that this isn’t ideal for a chest where you are worried about someone loosening the hinges and stealing your tools. In this case, the thief would probably just grab the whole chest and not bother with jimmying your hinges.
— Christopher Schwarz
No comments:
Post a Comment