Wednesday, December 31, 2014

The Best Defense Against Rust: Frank Klausz


Two of my favorite celebrities in woodworking, Chis Schwarz and Frank Klausz...

By:  | 


handblock_IMG_0424
I wish I could send Frank Klausz to the shop of every reader to teach you the following lesson, but I think he’s busy.
The first time I met Klausz was at a woodworking show on the East Coast about 15 years ago. He was demonstrating wooden moulding planes; I was demonstrating some infill planes I had built. At one point during my demonstration, Klausz walked up to my bench and picked up my panel plane to examine it.
Then he walked away with the tool.
He returned about 15 minutes later with the tool and scolded me in front of everyone for allowing some rust to bloom on the iron and cap iron. He had taken the tool apart, cleaned it, oiled it and reassembled it.
Klausz set the bar for me that day, and I will always be grateful for the drubbing.
All tools – hand or power – need care. If you don’t have time to maintain all your tools, you probably have too many of them.
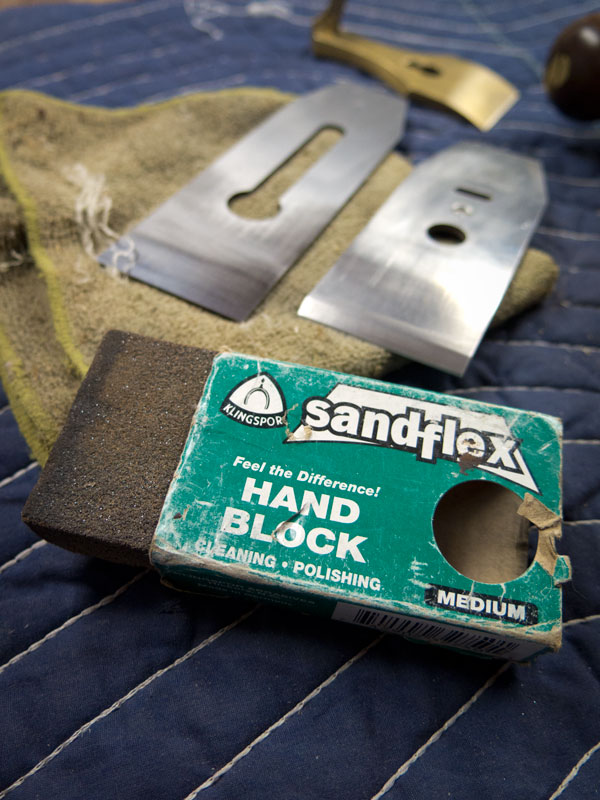
Shown above are my two primary weapons in keeping Klausz (and rust) at bay. An oily rag and a medium-grit hand block, which is basically a rubberized abrasive. The rag can be soaked with any oil. Repeat: Any oil. Even olive oil and/or motor oil. I use jojoba oil because I don’t need any more volatile organic compounds in my life.
When I finish using a tool for the day, I brush off all the sawdust and inspect the tool. If I see a spot of corrosion, I remove it with the hand block. Then I wipe the tool with the oily rag. When I sharpen a tool, I inspect the tool closer and remove any pitch on the cap iron with the hand block.
Every year (about this time of year, actually), I take an hour to strip my planes completely and put some machine oil on all the moving parts.
The result? No more scoldings and no more rust.
— Christopher Schwarz
The next best thing to taking a class with Frank Klausz is his seven-hour DVD on joinery “Joinery Master Class.” It’s fantastically priced. You can even download the entire thing and take Frank with you wherever you go (scoldings not included).

Tuesday, December 23, 2014

Pins vs. Tails

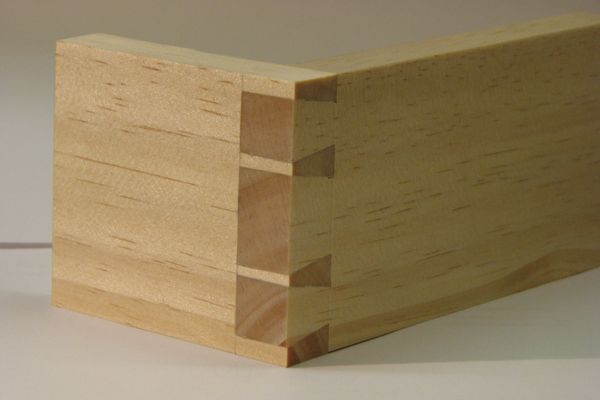
From Lost Art Press a really interesting technical discussion on how wood reacts to mechanical forces. The primary example used is a dovetail joint; however, I found that this information can directly relate to boat building as well. 


Pins vs. Tails

by steveschafer
dovetail
Pins or tails first? Yes, it’s that eternal question, once again: If you overload a dovetail joint, which will fail first, the pin board or the tail board? I was inspired to take a closer look at this after reading a comment posted to Chris’s Popular Woodworking blog a while back: the poster was concerned about the strength of the skinny little pins in so-called London Pattern dovetails. Chris’s response (which was the correct one) is that it doesn’t really matter, because dovetail joints are generally overkill for what they’re meant to do.
But it does beg the question: Can you make your pins too skinny? What about your tails? To get some insight, I fired up the finite element analysis engine once again. But before we get to that, a brief refresher on stress and strain (you did take engineering mechanics in school, right?). You can skip to the juicy stuff if you get bored.
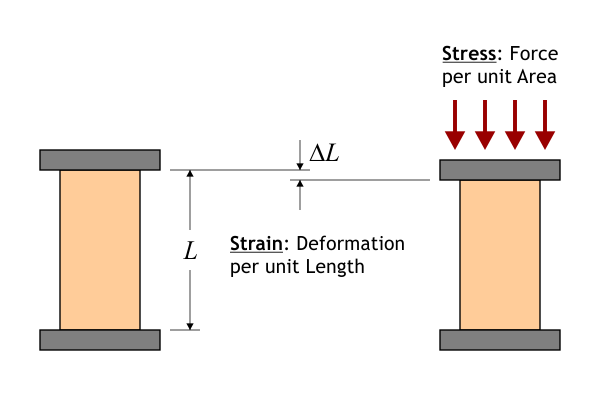
When we apply a mechanical force of some kind to a chunk of material, we exert astress on that material. If the material deforms because of the stress, the deformation is known as strain. There are a variety of different kinds of stresses and strains; for analyzing dovetail joints we’ll concentrate on two: tensile and shear.
Tensile stress occurs when we push or pull on our material in a direction perpendicular to the surface:
stressesAndStrains1
Tensile stress
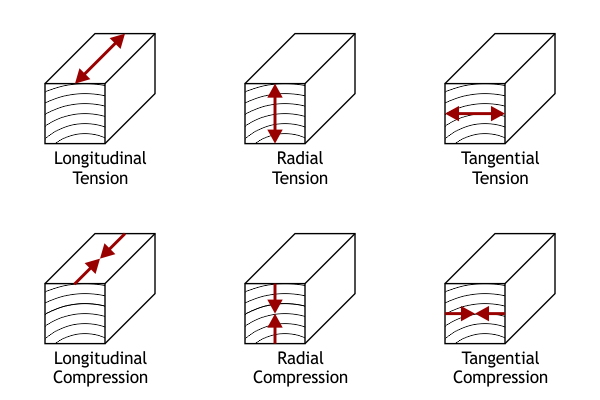
As long as we don’t exert too much stress, the relationship between stress and strain is linear: double the stress, double the strain. The ratio of stress to strain in a given material is known as the modulus of elasticity, or Young’s modulus. Because wood is anisotropic (it has different mechanical properties along different axes), we need to keep track of three separate elastic moduli, one for each of the major axes (longitudinal, radial and tangential). Finally, we can apply either tension or compression along each of those three axes, so there are six basic kinds of tensile stress that a piece of wood might have to endure:
stressesAndStrains2Wood is very strong in longitudinal tension and compression, much weaker in radial tension, and weaker still in tangential tension. (Anyone who has ever split logs knows this instinctively.) Radial and tangential compression tend not to follow idealized elastic behavior; a localized compressive stress will lead to a dent where the sides of the depression have undergone tension failure.
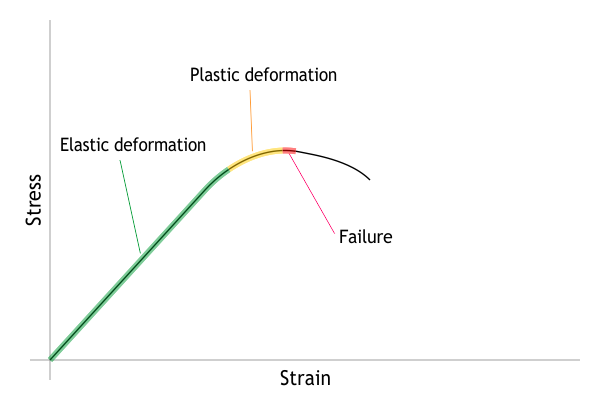
Speaking of elastic behavior, a typical stress/strain graph looks like this:
stressesAndStrains3In the first portion of the graph (low stresses) the material undergoes elastic deformation, meaning that when the stress is removed, the material returns to its original dimensions. As the stress increases, the material reaches a point where it can no longer fully recover after the stress has been removed. This is known as plastic deformation. As the stress increases still further, we reach a level of stress at which the material fails, often catastrophically.
The other kind of stress that we need to know about is shear stress. In contrast to tensile stress, shear stress is applied parallel to a surface:
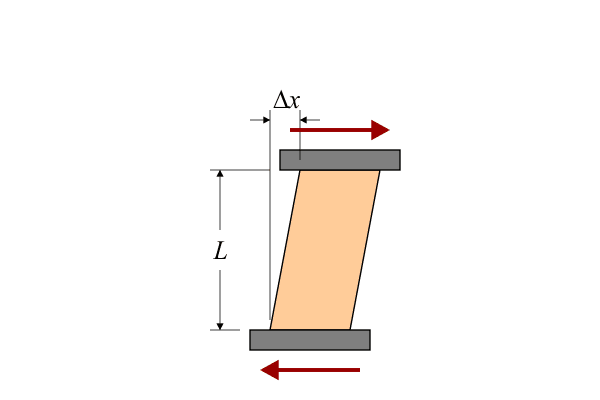
stressesAndStrains4
Shear stress
The ratio of stress to strain in shear is known as the modulus of rigidity, or shear modulus. As with tensile stress, we need three separate shear moduli, and we need to consider six different ways of applying shear to our material:
stressesAndStrains5Collectively, RT and TR shear are sometimes called rolling shear; you can imagine the wood fibers rolling alongside each other. Although wood fails readily when subjected to rolling shear, it’s not something that comes up too often in typical wood construction, simply because we don’t often design joints in such a way that rolling shear occurs. One area where it is important, however, is in plywood; when a piece of plywood is bent too far, it can delaminate as a result of rolling shear failure.
LR and LT shear are the two kinds of longitudinal shear. Wood is generally more resistant to longitudinal shear than rolling shear; however, longitudinal shear is a common failure mode in an overloaded beam.
Finally, RL and TL shear are the two kinds of transverse shear. Except for certain brittle softwoods, like western redcedar, wood very rarely fails in transverse shear: it will undergo tensile failure first.
There is one final complication to all of this: When we pull on a piece of material, in addition to getting longer, it gets skinnier. Conversely, when we push on it, in addition to getting shorter it gets fatter:
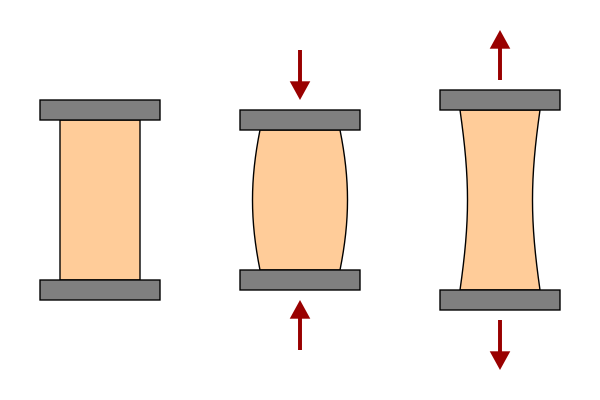
stressesAndStrains6The degree to which this occurs is known as Poisson’s ratio. (An example of a material with an exceptionally large value for Poisson’s ratio is Jell-O®.) And, once again, since wood is anisotropic, there are three values that we have to keep track of. The reason that Poisson’s ratio complicates things is that it introduces “crosstalk” between the axes. Exert longitudinal tension, and you get radial and tangential tension, too.
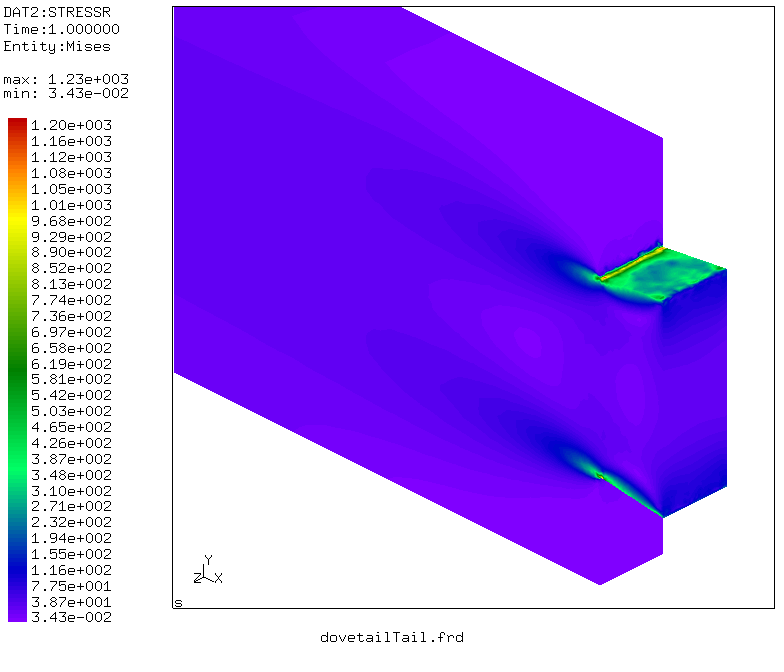
So, when we model the mechanical behavior of a wooden structure, we have to take all of this into account. (Fortunately, we just have to specify the nine material properties; the modeling software does the rest.) For this investigation, I used values for dry black walnut (values for an assortment of woods are listed in the Forest Product Laboratory’sWood Handbook). I modeled the joint as two quartersawn boards, 12″ L x 4″ W x 3/4″ T, with a single large dovetail (1:8 slope). For this simulation, I used Calculix software, and the joint was loaded as if I were trying to pull the tail board straight out of the joint.
The result for the worst-case tensile stress in the tail board is shown here:
dovetailTailTensileStressAs you can see, the stress is highest at the root of the tail. And if you’ve made enough dovetail joints, you’ve probably seen at least one tail board with a crack beginning right at that point. Although you can’t see it in the figure, the maximum tension is in the Y direction, across the width of the board.
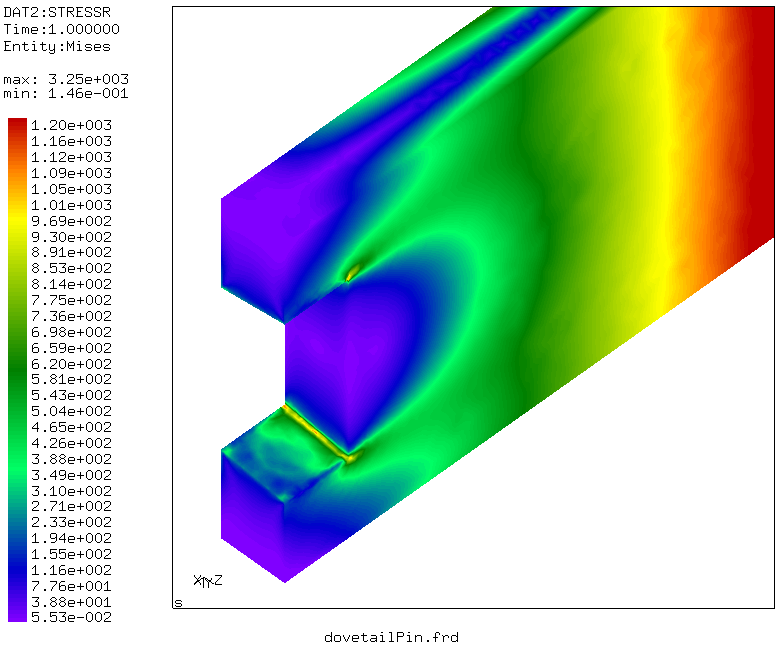
The result for the pin board looks like this:
dovetailPinTensileStressAgain, the maximum stress is along the root. (And veteran dovetailers have probably seen a crack or two in this area as well.) By the way, the reason for the high stress way down the board, away from the joint, is because the far end of the board is fixed, and therefore the board is bending from the force trying to pull the joint apart.
Maximal shear stresses are shown below; they are concentrated in the same areas:
dovetailTailShearStressdovetailPinShearStressAlthough the shear stresses are much lower than the tensile stresses, note that shear strength is also quite a bit lower than tensile strength, so shear failure is still a possibility. The result (a crack) would be the same, however, so it would be difficult to know exactly how the wood failed. One purely shear failure mode would be if the tip of one of the tail's “ears” sheared off.
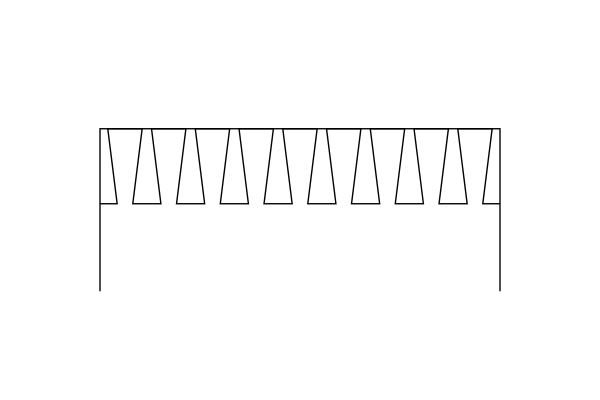
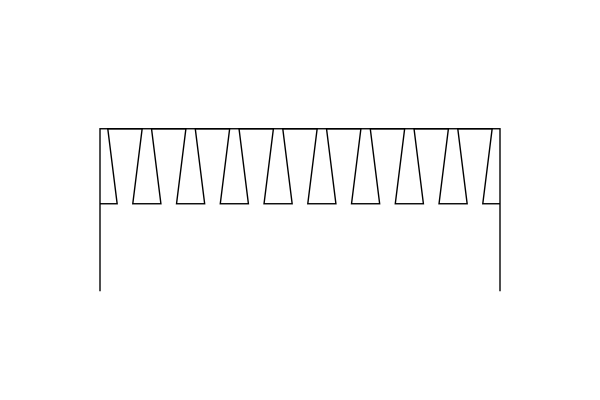
The most important takeaway from these images is to note how the stresses are very tightly localized, right at the joint surfaces. The bulk of the material in both tails and pins is just sitting there doing nothing useful. That tells you that skinny pins (and skinny tails) are just fine. In fact, if you’re concerned about the strength of a dovetail joint, a solution would be to use as many pins and tails as you can cram into the width of the joint; that way, any destructive forces are spread out over more joint surfaces:
stressesAndStrains7
MaxStrength™ dovetail joint – lots of skinny pins and tails, but be careful to avoid making the half-pins (or half-tails) at the ends too thin
So who wins, pins or tails? As it turns out, the peak tensile stresses are very close in the two halves of the joint. Given that the wood is quartersawn, I’d have to declare the tail board as the victor, since its major stress component is in the radial direction, whereas for the pin board it’s in the tangential direction. However, if the boards were flatsawn, it might very well go the other way.
Of course, in a real-world hand-cut dovetail joint, one of the tails or one of the pins will inevitably be tighter than the rest, and that’s where the failure is going to occur.
–Steve Schafer
Thursday, December 18, 2014

Festool promotional video

Received an email from Festool today that contained their best videos of 2014. One of the videos pertained to boat building and the use of their dust extraction system coupled with a rotex sander. This setup is very similar to one used at the school.

Link: https://www.youtube.com/watch?v=MDdEDyfbR8c


Festool Power Tools

Video

Best Saving History with Festool:
Saving Canada's Oldest Sailboat, Tony Grove

Tony Grove has been a shipwright for more than 30 years specializing in wooden boat restoration. He has also been teaching boat building for about six years. Over the course of his career, he has had experience with a variety of brands and quality of tools and seen various advancements. With that wisdom, he has learned the importance of investing in quality tools.

Currently, Tony is restoring Dorothy, the oldest sailboat in Canada, for the maritime museum. The many layers of paint on Dorothy are tainted with toxic elements like lead, arsenic and copper. Always use proper safety equipment and practices, including a respirator.

The lightweight and exceptional dust extraction of the Festool Rotex RO 125 and CT HEPA Dust Extractor offer a great solution for assisting in the restoration of this historical boat. The RO 125 features multi-mode capabilities: an aggressive mode for stripping and rough sanding, and an random orbital mode for fine finish sanding. This capability makes the RO 125 a very versatile sander.

Tony states that the remarkable dust extraction from the Festool CT HEPA Dust Extractor is what really impresses him, so much so that he calls it unbelievable.

Tuesday, December 16, 2014

Hacker Runabout

On Monday we had a presentation given by a 2014 graduate, Matt, on the Hacker Runabout that will be completed by the Traditional Large Craft class. Matt started the build last year with his class and is coming back to the lead the project.


This 21-foot runabout was designed by John L Hacker in the mid-1930's while working in Detroit Michigan for the Canadian Greavette Company. The new boat will have a bottom laminated of mahogany over marine plywood, and will have mahogany sides and decks. It will be powered by a Crusader six-liter engine.


Hacker-Craft is the name given to boats built by The Hacker Boat Co., the oldest builder of wooden motorboats in the world. It is an American company, founded in Detroit, Michigan in 1908 by John Ludwig Hacker (known as John L. Hacker or just "John L."). The company moved operations to New York State in the 1970s and continues to produce hand-built boats in Silver Bay, on the shores of Lake George, New York.

John L. Hacker (1877–1961) was a naval architect and American motorboat designer. His major design and engineering accomplishments include the invention of the "V"-hull design and the floating biplane for the Wright brothers. Hacker's success in the design and building of speed craft surpassed all others of the time.

Monday, December 15, 2014

Traditional Small Craft projects for next semester

Batela

The Batela is a traditional Venetian boat, that is, developed in the Italian city of Venice. It is a flat-bottomed boat with a slight degree of rocker (meaning, the bottom is curved from bow to stern) to make it easier to row and control. Rowed standing up, it is essentially a cargo carrier or ferry.

The Traditional Small Craft class of 2015 under the direction of Master Instructor Jeff Hammond will complete the boat.
The batela is approximately 30 feet long, and will be built largely of western red cedar over sawn frames.
This is an extremely interesting commission in that the boat was developed using design input provided by the owner in the form of sketches and commentary accompanied by video of Venetian batelae. Jeff drew the boat using that data, and refined it based on additional commentary and guidance to meet the owner’s direction.

Sid Skiff


Type: Sail
Construction: Wood
LOA: 16'
LWL: 15'6"
Beam: 4'5"
Draft: 1'5"
Displacement: 450

Master Boatbuilder Ray Speck drew the lines for this classic Puget Sound small craft while working as a boatbuilder in Sausalito CA. Ray saw that the harbormaster, Sid Foster, was using a particularly sweet little 12' 5" lapstrake skiff to row around Richardson Bay.
Ray took the little skiff's lines with Sid's permission, and over time, developed them into a range of skiffs from 13 to 18 feet long. Ray estimates he's built just about one hundred of these beautiful boats so far in his nearly 45 year career as a boatbuilder, many of them while teaching at the Northwest School of Wooden Boatbuilding. 
You can row one of Ray's Sid Skiffs, built in the mid-1980's, at The Center For Wooden Boats in Seattle WA on south Lake Union www.cwb.org
This Sid Skiff has a mahogany backbone, and is planked with western red cedar over white oak frames. It is fastened with copper rivets and bronze fastenings. Spars are spruce, and the 24-inch centerboard is steel. Oar pads are locally harvested black locust.

Catspaw Dinghy
(we will be building the lapstrake version)


An open boat that rows with ease and swiftness and is stiff enough under sail to stand up to a breeze.

LOA - 12' 8 3/8"
Beam - 4' 5 5/8"
Draft (cb up) - 6 1/2"
(cb down) - 1' 8"
Weight - 150 - 200 lbs.
Sail Area : 65 sq. ft.
Construction: Carvel planked over steamed frames
Alternative construction: Lapstrake or strip

Designed by Joel White & N.G. Herreshoff

Sunday, December 14, 2014

Summary of course work

For the Fall Semester, the course work was focused on five areas: Classic Woodworking, Drafting, Lofting and Skiff Construction.

BEGINNING PROJECTS
Introduction to hand tools
General shop safety practices
Stationary power tools
Hand held power tools
Bevel boards
Bevel gauges (small and medium)
Carlin Joints & deck beams
Lathe & spindle turning
Wooden mallet
Rabbet
Shoulder tool box
Spar gauges
Spar section

DRAFTING
Identify and describe the lines of offset used to define the shape of a boat hull
Draw the grid and describe what it represents
Use the table of offsets to plot and draw the Master Lines
Differentiate between a fair line and a line that is not fair within the lines as a whole
Create a fair set of water, body, buttock and diagonal lines
Prove-out the completed set of lines
Build a half-hull model using the completed set of lines

LOFTING
Draw and prove-out full scale set of lines
Develop the Bearding and Back rabbet lines
Develop the Deck Camber
Develop the Clamp taper and expansion
Determine the bevels using the body plan
Make the mold reduction and shelf/clamp expansion
Develop a curved/raked transon
Make patterns and templates to transfer developments for making components

Adhesives

Last week we had a short class on adhesives given by Bruce, who heads the contemporary boat building program at the school. Besides being an excellent wood boat builder and instructor, Bruce is an expert on everything sticky...what I meant to say is specifically adhesives, glues and especially epoxy. No judgement will be made in comparing "traditional" boat building techniques to the newer ones that use plywood, laminates and composite materials. In a very short boat building career (two weeks) I have found that adhesives do play an important role in all types of boat building.

How do you know? The answer is you just do. Actually, Bruce explained the numerous tests that he has tried using various adhesives and how they performed as advertised. One caveat is that you MUST always follow the manufacturer's recommended instructions. Period.

What do you need to do to use adhesives effectively:
1. good glue joint
2. correct clamping pressure
3. no gap filling

Some of the products used:


J-B WoodWeld is a fast setting two-part epoxy system formulated for wood bonding and repairs. When fully cured it can be shaped, tapped, filed, sanded and drilled. It provides a lasting permanent bond that is stronger than the wood! J-B WoodWeld has a 1:1 mixing ratio, sets in 6 minutes and cures in 1-3 hours. Rated at a tensile strength of 1800 PSI, J-B WoodWeld cures to a light tan color.


Titebond III Ultimate Wood Glue is the first one-part, water cleanup wood glue ever offered that is proven waterproof. The waterproof formula passes the ANSI/HPVA Type I water-resistance specification and offers superior bond strength, longer open assembly time and lower application temperature. 

Titebond III is non-toxic, solvent free and cleans up with water - safer to use than traditional waterproof wood glues. It provides strong initial tack, sands easily without softening and is FDA approved for indirect food contact (cutting boards). The ultimate in wood glues - ideal for both interior and exterior applications.


3M™ Marine Adhesive Sealant 5200 is extremely strong and retains its strength above or below water line. Stays flexible too - allows for structural movement. Has excellent resistance to weathering and salt water.
  • High performance polyurethane adhesive/sealant becomes tack-free in 48 hours, fast cure product in 1 hour
  • Strong seal retains strength above or below the water line
  • Excellent resistance to weathering and saltwater
SIKAFLEX®-291

Sikaflex-291 is a 1-component, marine grade polyurethane elastomeric adhesive and sealant. Used by many boat builders, its fast cure time makes it ideal for applications where speed is important.

General all-purpose marine sealant, which may be used for light duty bonding.
  • Use above and below water line
  • Resists salt water
  • Fast strength build-up
  • Excellent adhesion to gelcoat, fiberglass, metal and wood
  • May be squeezed or brushed into place
  • Stable
  • Paintable
  • Versatile packaging
  • Excellent bond
  • Fast tack-free time
  • High solids content
  • Sandable
** One tip when using a compound to form a gasket (for say a thru hull) is to snug the fastener but not tighten, wait 24 hour for the compound to cure and then tighten the fastener.

EPOXY

Used for bonding, coating, laminating and glass work.
Best used with a metering pump as the mixture needs to be accurate.
West Systems - 105 Resin ans 206 Hardener mixed at a 5 to 1 ratio.

Bruce's Rules for Mixing Epoxy:
1. flat bottom cup
2. non-waxed cup
3. sides must form a right angle
4. use a mixing stick
5. use gloves
6. mix for 60 seconds

Specialty Epoxies:

WEST SYSTEM 650-8 G/flex Epoxy
A toughened, versatile, liquid epoxy for permanent waterproof bonding of fiberglass, ceramics, metals, plastics, damp and difficult-to-bond woods. With a modulus of elasticity of 150,000 PSI, it is a bit more flexible than standard epoxies and polyester, but much stiffer than adhesive sealants. This gives G/flex 650 the ability to make structural bonds that can absorb the stress of expansion, contraction, shock and vibration. It is ideal for bonding dissimilar materials. It can be modified with West System fillers and additives, and used to wet-out fiberglass tapes and fabrics. Mixed at a 1:1 ratio, G/flex 650 gives you 45 minutes of working time at room temperature. It reaches an initial cure in 7 to 10 hrs and full cure in 24 hrs.


LOCTITE® EPOXY INSTANT MIX™ 5 MINUTE
Loctite® Epoxy Instant Mix™ 5 Minute is a two-part adhesive consisting of an epoxy resin and a hardener. When mixed in equal volumes, the resin and hardener react to produce a tough, rigid, high strength bond, which starts to set in 5 minutes and reaches handling strength in 1 hour. The static mix nozzle delivers a uniform mixture of resin and hardener every time. It can be used as an adhesive for a wide range of materials or as a versatile filler for gap bonding, surface repairs and laminating. Loctite® Epoxy Instant Mix™ 5 Minute does not shrink and is resistant to water and most common solvents. It can be tinted with earth pigments, cement or sand for color matching and can be sanded and drilled.

** Tip for using rags. Fold it multiple times. Wipe in a straight line. Only use side once, Fold over to use remaining clean sides.